- What Makes a Media Wall Look Clean and Stay Reliable?
- What Is the Best Layout for a Home Media Wall?
- Tilt vs. Full-Motion TV Mounts
- How Do You Route TV Cables Behind a Wall?
- HDMI 2.1 and eARC Cabling Requirements
- Soundbar vs. AVR for a Media Wall
- How Much Does a Custom Media Wall Cost?
- How Do You Keep Media Wall Gear Cool and Quiet?
- How Do You Keep Media Wall Control Simple?
- Recommended Gear
- FAQs
- Checklist
- References
- Plan seating, screen height, power, low-voltage routing, and audio before any drywall cuts or finish trim decisions.
- Use a listed in-wall power relocation kit or licensed electrical work behind the TV. Do not hide a factory TV power cord inside the wall.
- Use certified Ultra High Speed HDMI for short 4K120/eARC runs and choose active optical HDMI or HDBaseT deliberately for longer pathways.
- Most living rooms work best with a tilt mount and a soundbar; larger rooms and hidden-speaker designs justify AVR or amplifier planning.
- A clean media wall usually costs more in labor and pathway planning than in cable itself, especially in finished Westchester homes.
- TV mounting: proper height and power relocation
- Soundbar vs AVR + speakers
- Home entertainment services
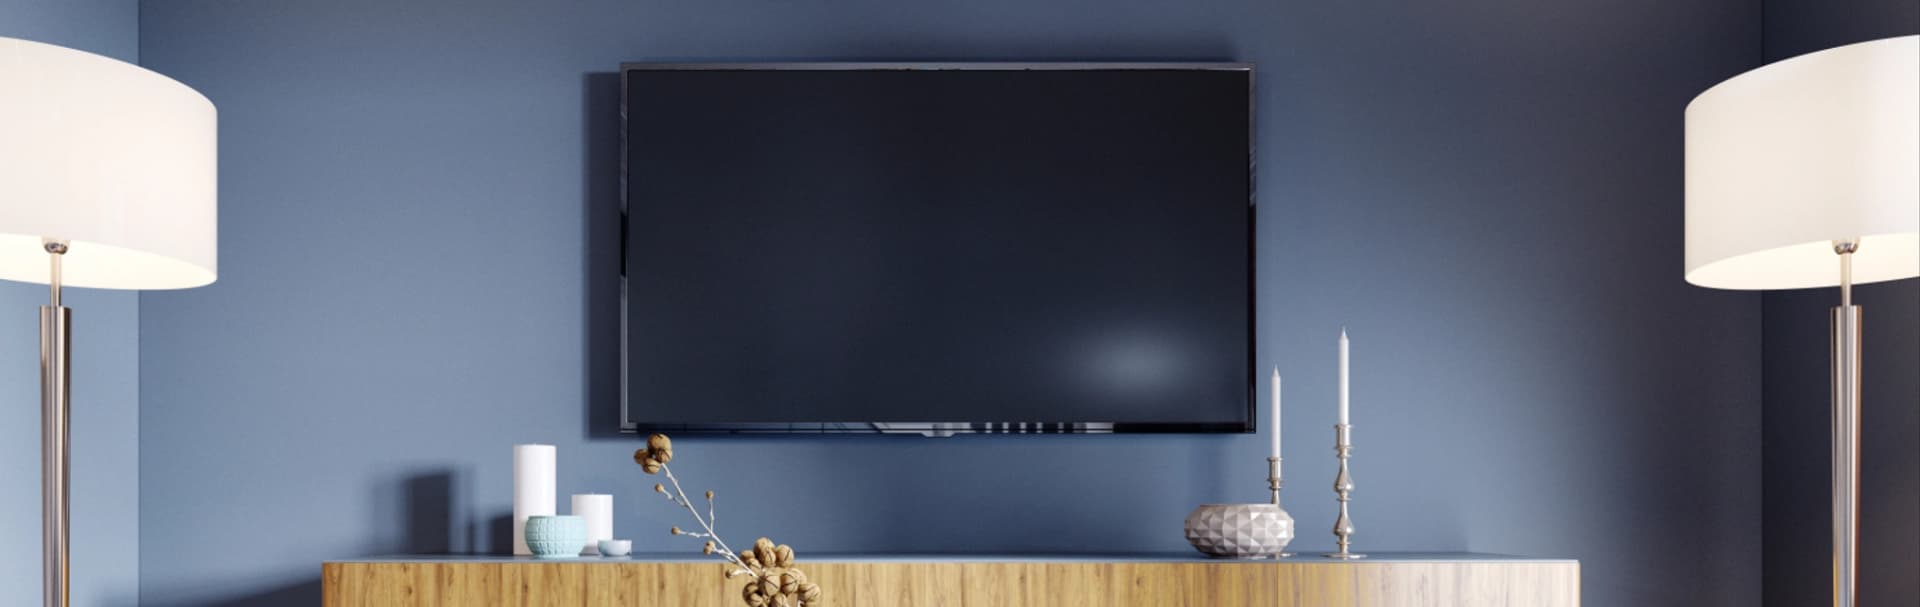
What Makes a Media Wall Look Clean and Stay Reliable?
A clean media wall comes from solving structure, power, low-voltage, HDMI, cooling, and control before the TV goes on the wall.
That sequence matters more than any single product. In Westchester homes, the projects that age well are the ones where mount height, outlet location, cable pathways, and equipment ventilation were planned before trim work, stone veneer, or millwork locked the wall into place.
What Is the Best Layout for a Home Media Wall?
The best media wall layout centers the screen near seated eye height, keeps the audio close to the display, and leaves a realistic pathway to power and hidden equipment.
Start by measuring where people actually sit. For most sofa-based living rooms, the screen center usually lands near seated eye height. If the TV must go higher because of a fireplace or built-ins, test the height with tape on the wall before drilling and plan on a tilt mount instead of pretending the room will feel fine later.
If you are still choosing a display, size the TV from the seating distance first and build the wall around that decision. Decorative symmetry is secondary to comfort, glare control, and service access.
Tilt vs. Full-Motion TV Mounts
A tilt mount is best for most media walls, while a full-motion mount is worth the extra structure only when you need off-axis viewing or rear service access.
Tilt mounts keep the TV close to the wall, reduce glare, and help when the display sits a little above ideal eye level. Full-motion mounts solve real problems in corner seating, awkward room geometry, or service-heavy setups, but they also create leverage on the wall and demand careful cable slack planning.
- Tilt mount: best default for fixed seating and a low-profile wall
- Full-motion mount: best when you must angle the TV or regularly access the rear panel
- Always anchor into studs or masonry and add blocking when the mount location does not line up cleanly
How Do You Route TV Cables Behind a Wall?
In-wall cable routing requires a code-compliant power solution, separate low-voltage pathways, and enough access to service or replace cables later.
Do not run a factory TV power cord or extension cord inside a wall cavity. In typical residential work, that is not a compliant substitute for fixed wiring under NEC 400.12. The clean options are a listed in-wall power relocation kit fed from a nearby receptacle or licensed electrical work to place a proper recessed outlet behind the display. Final interpretation still belongs to the local AHJ.
Low-voltage wiring should use its own hardware and pathway. We typically place one recessed or low-voltage opening behind the TV and another behind the cabinet or media console. If the project includes a remote rack, difficult masonry, or likely HDMI upgrades later, install 1-inch flexible ENT conduit between the display and the gear location before the wall closes.
- Separate line voltage from HDMI, Ethernet, and speaker cabling
- Use recessed power and low-voltage boxes so plugs do not force the TV off the wall
- Add conduit when the pathway is hard to reopen later
- Label both ends before the TV covers the wall plate
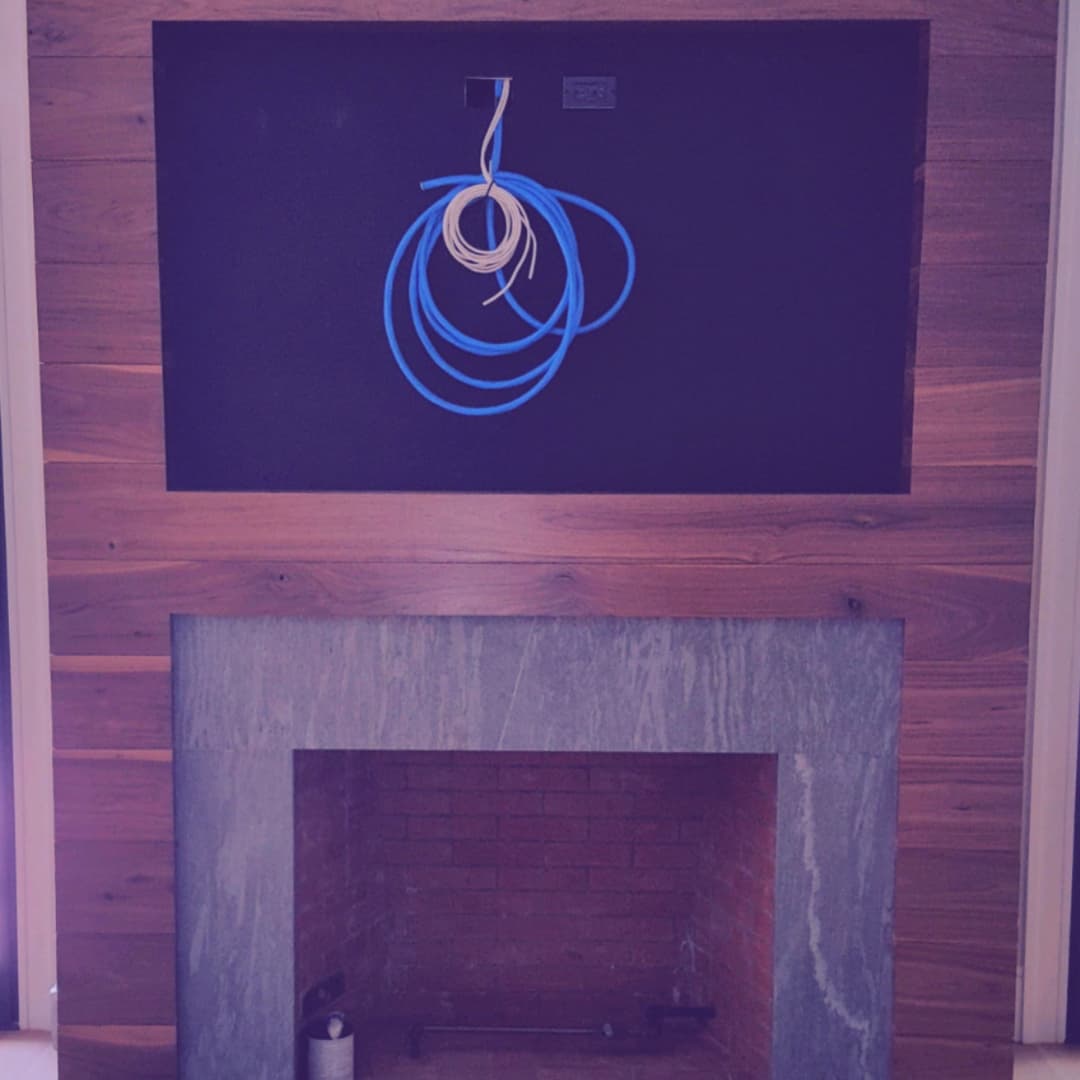
Use listed in-wall power relocation hardware or licensed electrical work for the TV power location. Keep low-voltage cable types and support hardware matched to the wall use and local code expectations.
If you are in Westchester County, we can scope a stud-secure mount, in-wall power, low-voltage routing, and conduit before the wall gets cut.
HDMI 2.1 and eARC Cabling Requirements
Use certified Ultra High Speed HDMI cables for short 4K120/eARC runs, and plan long runs around distance and bandwidth instead of hoping any cable path will work.
For short display-to-soundbar or display-to-cabinet runs, certified Ultra High Speed HDMI is the right default. That certification class is built for the current 48 Gbps HDMI 2.1 feature set, including 4K120, VRR, and eARC. Uncertified cables are a common cause of signal dropouts, HDCP handshake failures, and flaky CEC behavior.
Long runs need a different plan. Standard passive copper HDMI is usually the easiest answer for short distances, but once the pathway becomes long, tight, or service-hostile, active optical HDMI is usually the cleaner way to preserve modern video bandwidth. HDBaseT still has value for long structured runs and some distribution scenarios, but it should be specified around the exact signal requirement rather than treated as a universal answer for every 4K120 gaming chain.
| Option | Best fit | Typical distance | Main tradeoff |
|---|---|---|---|
| Passive copper HDMI | TV to nearby cabinet or soundbar | Usually under 10-15 ft | Simple and durable, but not ideal once the run gets long or tightly routed |
| Active optical HDMI | Remote rack, basement, closet, or longer conduit run that still needs full HDMI 2.1-class bandwidth | Roughly 15-50+ ft depending on pathway and product | Directional cable and more care required during pulling |
| HDBaseT / HDMI-over-category | Long structured runs or some distributed AV designs | Often the best fit once the path is very long and category cable is easier to service | Signal support varies by extender generation and feature set; do not assume full 4K120/VRR support without checking the exact kit |
We also recommend Ethernet at the TV location and at the cabinet or rack. TVs, streamers, control hubs, and gaming gear behave more predictably when the fixed devices are wired and Wi-Fi is left for phones, tablets, and laptops.
-
Use certified Ultra High Speed HDMI for 4K120 and eARC reliability
-
Pull Ethernet to the TV wall and the gear location
-
Choose active optical HDMI before the wall is closed if the rack is remote
Soundbar vs. AVR for a Media Wall
A soundbar is the best fit for most living-room media walls, while an AVR or streaming amplifier is the better choice when the room is large, open, or built around hidden speakers.
For many shared living rooms, a soundbar plus subwoofer gives the best balance of dialogue clarity, clean looks, and simple daily control. In 2026 Sonos Arc Ultra is the current premium Sonos bar, while Beam (Gen 2) still makes more sense in smaller rooms and secondary TV spaces. If the project needs more headroom, a wider front stage, or in-ceiling/in-wall speakers, move up to an AVR or an amplifier such as Sonos Amp and plan the wiring and ventilation from the start.
-
Soundbar + sub: best for simple living-room control and minimal visible gear
-
AVR + speakers: best for large rooms, stronger dialogue anchoring, and surround expansion
-
Amplifier + architectural speakers: best when the wall should stay visually quiet and the room is already being wired
How Much Does a Custom Media Wall Cost?
A basic DIY media wall can stay in the low hundreds of dollars in materials, while professionally installed projects usually move into the high hundreds or low thousands once electrical work, finished-wall routing, and patch coordination are included.
The material cost is usually not the hard part. The variables that move the number are finished-wall access, fireplace or stone work, mount reinforcement, conduit, remote-rack distance, and whether the project needs licensed electrical work or drywall repair. In Westchester, older walls and higher-finish rooms push labor faster than the cable itself.
| Scope | Typical range | What is usually included |
|---|---|---|
| DIY clean-up package | $180-$500 | Tilt mount, listed in-wall power kit, low-voltage brackets, conduit, and one certified HDMI cable |
| DIY with premium audio | $700-$2,200+ | Above plus a Beam-class or Arc Ultra-class soundbar, depending on room and ecosystem |
| Professional basic media wall install | $500-$1,500+ | Mounting, concealed low-voltage, in-wall power solution, setup, and testing; drywall or paint can be extra |
| Professional custom media wall | $1,500-$4,000+ | More complex routing, fireplace or stone conditions, conduit, remote gear location, control work, and higher-finish coordination |
| Component | Typical price | Notes |
|---|---|---|
| Quality tilt mount | $100-$150 | Use a specific stud-secure model, not the cheapest generic bracket |
| Listed in-wall power kit | $80-$150 | Basic retrofit kits are cheaper than moving a receptacle with new line-voltage work |
| Certified 2m Ultra High Speed HDMI | $20-$40 | Short copper HDMI is inexpensive when chosen correctly |
| 1-inch ENT conduit and fittings | $20-$60 | Usually worth it wherever the wall will be hard to reopen |
| Sonos Beam (Gen 2) | $450-$500 typical street | Compact living rooms and secondary TV spaces |
| Sonos Arc Ultra | $1,000-$1,100 typical street | Premium living rooms where the bar must carry more of the room |
How Do You Keep Media Wall Gear Cool and Quiet?
Media wall gear stays reliable when equipment has airflow, reasonable cable slack, and a serviceable place to live instead of being packed tightly into decorative millwork.
Receivers, amps, streamers, game consoles, and network gear all create heat. A cabinet that looks clean but has no ventilation will eventually produce lockups, fan noise, or premature equipment failure. Leave air above and behind the gear, avoid stacking hot devices tightly, and add quiet ventilation when the cabinet is enclosed.
If the room needs to stay visually minimal, relocate the gear to a nearby cabinet or rack and keep only the display and audio bar visible at the wall.
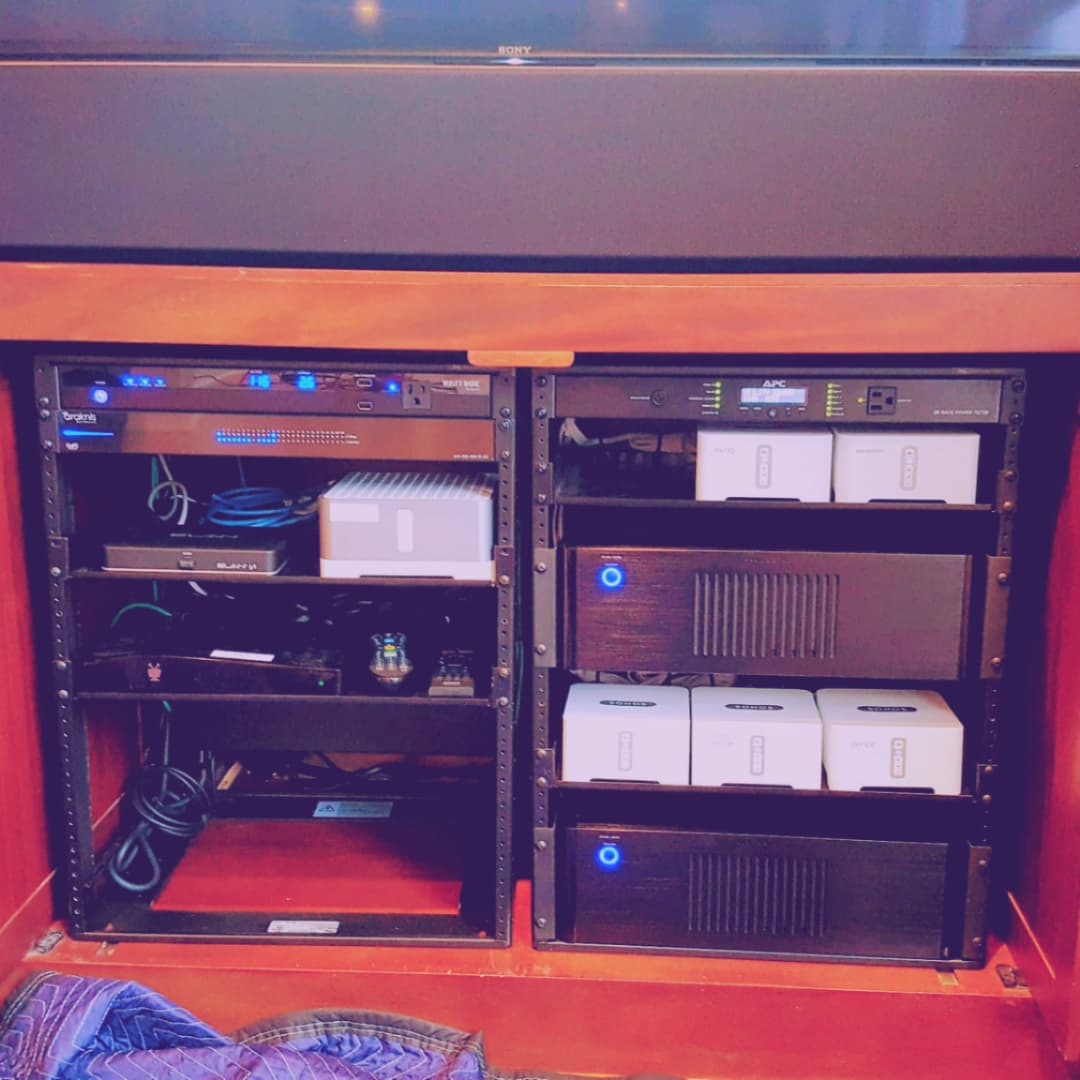
- Leave airflow space behind and above amplifiers and receivers
- Dress power and signal cabling so vents are not blocked
- Consider surge suppression and UPS protection for core AV and network gear
How Do You Keep Media Wall Control Simple?
The simplest reliable media wall uses one daily remote, eARC for audio return, and only as much CEC as the device stack can handle consistently.
We usually start with eARC enabled and basic CEC power and volume control. If that stack behaves, stop there. If CEC becomes unreliable because of a specific TV, soundbar, streaming box, or matrix, replace the flaky behavior with a proper control layer instead of teaching the household workarounds.
- Enable eARC and confirm the TV audio format matches the sound system
- Use CEC for basic power and volume only when the specific stack is stable
- Step up to a universal remote or automation scene when reliability matters more than saving one device
Recommended Gear
These are the practical building blocks we would reach for in a real media wall project. Live retailer pricing can move, so treat the cards as current shopping context rather than a fixed quote.
This card highlights the product details most relevant to this section.
- Low-profile tilt mount sized for common living-room and fireplace TV installs
- Universal design for 42-inch to 90-inch TVs with included hardware
- Better fit than a fixed mount when the screen lands slightly high

This card highlights the product details most relevant to this section.
- Ultra High Speed HDMI certified for current HDMI 2.1 feature sets
- 2-meter length fits common TV-to-soundbar or TV-to-cabinet runs
- Supports 4K120, 8K60, VRR, and eARC when the rest of the chain is correct
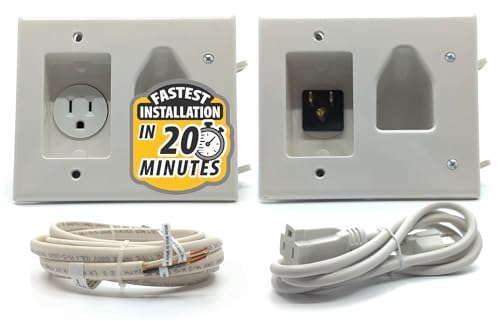
This card highlights the product details most relevant to this section.
- Recessed in-wall power kit for cleaner TV installations
- Pairs line-voltage power relocation with a low-voltage cable path strategy
- Useful when the TV location needs a cleaner finish than a surface cord drop

This card highlights the product details most relevant to this section.
- Single-gang low-voltage brackets for Ethernet, coax, HDMI, and speaker cable terminations
- Flush old-work style bracket for clean wall plate installs
- Five-pack useful for rough-in planning across office, TV, and network locations

This card highlights the product details most relevant to this section.
- 1-inch blue ENT coil for concealed low-voltage pathways
- 100 ft coil length fits rack-to-attic and difficult future pull paths
- Purpose-built electrical nonmetallic tubing rather than generic split loom
This card highlights the product details most relevant to this section.
- Sound Motion technology for deeper bass and cleaner output in premium TV rooms
- Quick Tuning on iOS or Android, plus Advanced Tuning on supported iOS devices
- 9.1.4 Dolby Atmos soundbar with HDMI eARC

This card highlights the product details most relevant to this section.
- Virtualized Dolby Atmos with five-driver array
- HDMI eARC with CEC volume control
- Full Trueplay tuning requires a supported iPhone or iPad

This card highlights the product details most relevant to this section.
- 125 W per channel into 8 ohms for architectural speakers
- HDMI ARC input for TV audio integration
- Trueplay support when paired with supported Sonos Architectural by Sonance speakers
This card highlights the product details most relevant to this section.
- Dual tweeters with angled waveguides for stereo separation
- Wi-Fi 6 and Bluetooth 5.3 with line-in via USB-C adapter
- Quick Tuning on iOS and Android, plus Advanced Tuning on supported iOS devices
This card highlights the product details most relevant to this section.
- Six-driver array with side and upward-firing drivers for Dolby Atmos music
- Wi-Fi 6, Bluetooth 5.3, and line-in support
- Quick Tuning on iOS and Android, plus Advanced Tuning on supported iOS devices
FAQs
Do I Need Conduit Behind a TV?
You can build without conduit, but conduit is the cleanest future-proofing move. It lets you replace HDMI or add cabling later without reopening the wall.
Should the TV Be Wired or on Wi-Fi?
If you can wire it, do. Wired connections reduce buffering, improve control reliability, and keep fixed devices off the Wi-Fi network.
Why Does eARC Sometimes Act Up?
Most eARC issues come from cable quality, firmware mismatches, audio-format settings, or CEC conflicts. Start with a certified HDMI cable and a simple signal path, then add devices one at a time.
Is a Soundbar Enough for a Large Room?
Sometimes, but very large or open rooms usually sound better with an AVR or an amplifier driving properly placed speakers. The room layout matters more than the marketing on the box.
Should I Choose Sonos Arc Ultra or Beam (Gen 2)?
Choose Beam (Gen 2) for smaller living rooms and simpler TV spaces. Choose Arc Ultra when the room is larger, the seating is farther back, or you want the soundbar to carry more of the cinematic load without moving to an AVR.
Checklist
- Confirm TV size and screen-center height from the actual seating position
- Choose mount type before the wall finish and millwork are finalized
- Plan a listed in-wall power solution and a separate low-voltage pathway
- Add conduit between the display and the gear location where upgrades are likely
- Choose HDMI strategy based on distance before drywall closes
- Decide whether the room wants a soundbar, AVR, or amplifier-led speaker layout
- Verify ventilation, surge protection, and daily control before final handoff
References
External sources checked March 13, 2026.
Plan the project with a site visit
Confirm wiring, equipment, placement, and installation scope before hardware is locked in.