- How Does Room Size Affect Home Theater Setup?
- What Size TV Should You Buy for Your Room?
- TV Mounting and Placement Guidelines
- Soundbar vs AVR: Which Audio Setup Fits Your Room?
- Where Should You Place Surround Sound Speakers?
- What HDMI 2.1 and eARC Details Actually Matter?
- When Should You Centralize Equipment in a Cabinet or Rack?
- How Do Whole-Home Audio and Smart Home Control Work Together?
- What Budget Should You Expect for a Home Entertainment Upgrade?
- Common Pitfalls to Avoid
- Quick Checklist
- References
This 2026 refresh focuses on the decisions that most affect comfort, reliability, and day-to-day usability: screen size, mount height, speaker layout, HDMI paths, and whether the room should stay simple or grow into a larger system later.
- For a 4K TV, divide seating distance in inches by about 1.2 to estimate a comfortable screen size.
- Mount the screen center around 42-48 inches from the floor for typical sofa seating, then adjust for the room and furniture.
- A soundbar is usually the cleanest fit for living rooms; an AVR with separate speakers still wins in dedicated media rooms.
- Use Ultra High Speed HDMI cables when you need 4K/120, VRR, ALLM, or full-bandwidth HDMI 2.1 features.
- Modern smart-home integration is more about reliable control, scenes, and hub placement than chasing every new logo on the box.
How Does Room Size Affect Home Theater Setup?
Room size, seating distance, and walkways determine the right display size, speaker layout, and equipment location before you buy hardware.
Start by measuring the primary seat to screen wall distance, then note windows, fireplaces, traffic paths, and whether equipment noise will be noticeable from the seating area. In a bright family room, glare control and easy operation usually matter more than absolute black level. In a darker dedicated room, you can bias toward cinema performance, more speakers, and more centralized gear.
If the room has a fireplace, built-ins, or a narrow wall, treat those as constraints to work around rather than design goals. A visually clean system usually comes from solving power, low-voltage, and cabinet ventilation early, not from hiding every piece of hardware at the end.
- Measure the main seat first, not the back wall
- Decide whether sources stay at the TV or move to a ventilated cabinet
- Plan in-wall power and low-voltage before choosing the final mount location
What Size TV Should You Buy for Your Room?
For a 4K TV, divide seating distance in inches by about 1.2 to estimate a screen size that feels immersive without forcing head movement.
That formula is only a starting point, but it gives better guidance than the older "1.0-1.5x the diagonal" rule. If you sit 9 feet from the display, 108 divided by 1.2 lands near 90 inches, which means an 85-inch TV is a sensible real-world target. If you sit 8 feet away, a 75-inch set is often the practical sweet spot. If you sit 10 feet away, an 85-inch display still looks proportionate, while a 98-inch panel becomes worth considering if the wall and budget allow it.
| Seating distance | Math | Practical TV size |
|---|---|---|
| 7 ft (84 in) | 84 / 1.2 = 70 | 65-75 in |
| 8 ft (96 in) | 96 / 1.2 = 80 | 75-85 in |
| 9 ft (108 in) | 108 / 1.2 = 90 | 85 in |
| 10 ft (120 in) | 120 / 1.2 = 100 | 85-98 in |
Panel type still depends more on lighting than on marketing terms. In dedicated darker rooms, OLED remains the easiest way to get excellent black levels and contrast. In bright rooms with large windows, Mini-LED sets are often the better fit because they hold brightness better through daytime viewing and reflections. If you are weighing long-term OLED care or brightness tradeoffs, the separate LG OLED burn-in mitigation guide goes deeper.
If the main question is specifically which models handle glare and daytime sports best, the dedicated best TVs for bright rooms guide goes deeper on reflections, SDR brightness, and room layout.
For gaming, keep the console input on Game Mode and confirm the TV preserves VRR and ALLM on that specific input. The right panel is not just the prettiest one in a dark demo loop; it is the one that works in your room at noon and at night.
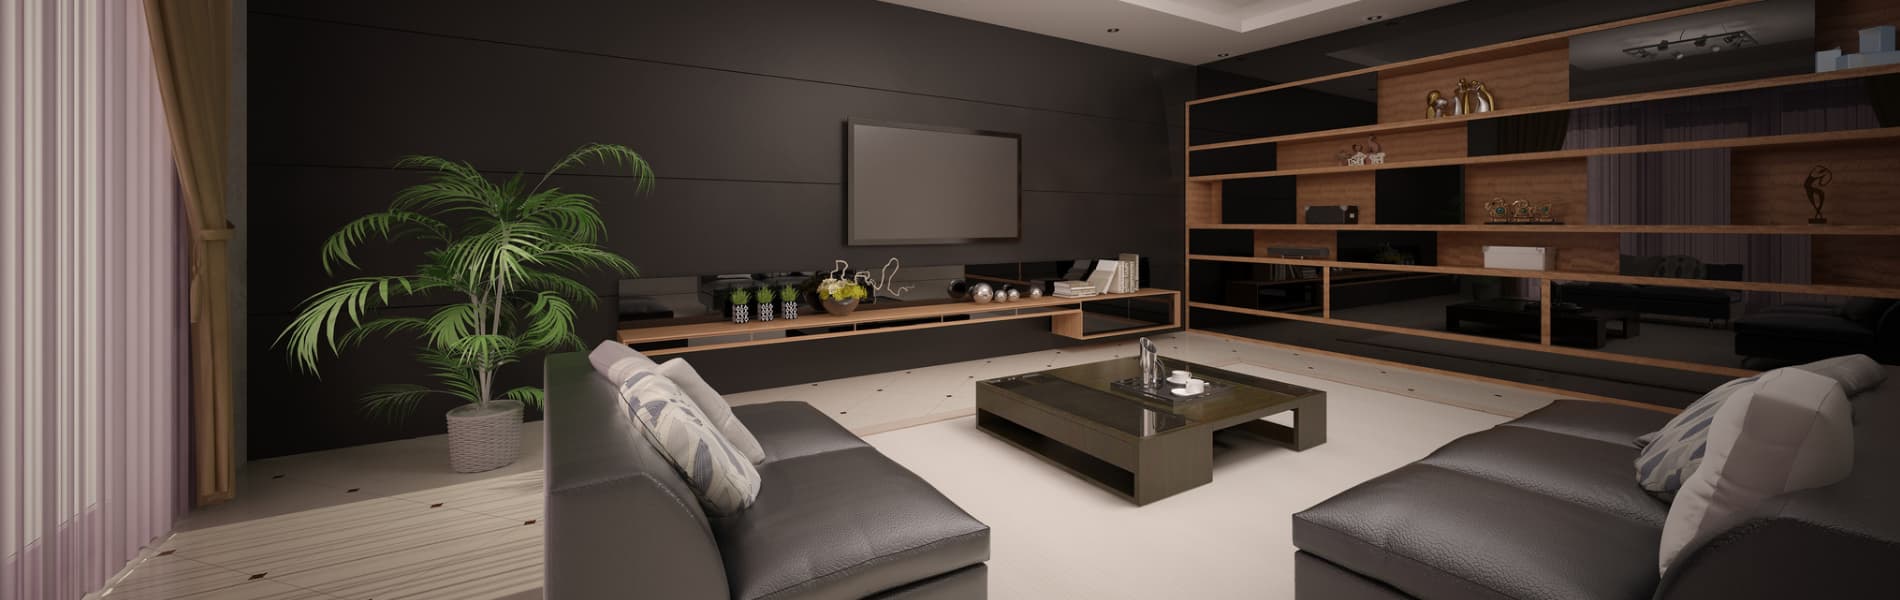
TV Mounting and Placement Guidelines
Mount the center of the screen around 42-48 inches from the floor for typical sofa seating, then adjust for seat height, room layout, and whether viewers are mostly seated or standing.
That number is a useful starting point, not a law. The main rule is still comfort: if the screen sits too high, viewers tilt their heads up, dialogue feels detached from the furniture, and off-axis performance often gets worse. In many homes, the cleanest answer is a fixed or low-profile tilt mount centered around seated eye level, with power and low-voltage planned so the wall stays tidy and safe.
When the wall forces a compromise, make that compromise explicit. Above-fireplace installs usually trade comfort for architecture, so they deserve a sober conversation about viewing angle, heat, and whether the room would be better served by a nearby wall instead. If you need an articulating arm for angled seating, verify the arm is rated for the panel's actual weight, VESA pattern, and depth, and leave enough cable slack for full movement.
-
Use a stud-secure mount sized for the panel
-
Use a recessed outlet or UL-listed in-wall power kit, not an extension cord in the wall
-
Keep the center channel or soundbar close to the screen so dialogue stays anchored
This card highlights the product details most relevant to this section.
- VESA compatible with common patterns
- Tilt for glare reduction and lower viewing angle
- Includes hardware kit for wood studs and concrete
This card highlights the product details most relevant to this section.
- Ultra High Speed HDMI Certified
- 4K120/8K60 support with eARC
- Nylon-braided or CL-rated options
We can scope a stud-secure mount, concealed low-voltage, and cabinet or rack layout before hardware is locked in.
Soundbar vs AVR: Which Audio Setup Fits Your Room?
A soundbar is usually the best fit for a shared living room, while an AVR with separate speakers still delivers the best surround performance in a dedicated media room.
The deciding factors are usually room type, wiring tolerance, and how much complexity the household wants. A good soundbar with a subwoofer and optional surrounds can sound surprisingly complete in a family room where visual simplicity matters. An AVR-based setup takes more planning, but it gives you better channel separation, stronger center-channel dialogue, more upgrade paths, and less compromise once the room becomes a real theater space.
| Option | Best for | Strengths | Tradeoffs |
|---|---|---|---|
| Soundbar + sub | Living rooms, dens, simpler installs | Clean look, faster install, fewer boxes, easier family use | Less upgrade flexibility, weaker channel separation, fewer placement options |
| AVR + 3.1 or 5.1 speakers | Media rooms, listeners who care about dialogue and immersion | Better center dialogue, better surround imaging, easier to expand later | More wiring, more planning, more cabinet or rack space |
Choose the simplest system that still matches the room's purpose. If the room is mostly TV, sports, and streaming with minimal visible gear, a soundbar often wins. If the room exists to watch films, host game nights, or grow into Atmos later, the AVR path is usually the better long-term value. The dedicated comparison in Soundbar vs AVR + speakers covers room-by-room tradeoffs in more detail.
Where Should You Place Surround Sound Speakers?
Place the front left, center, and front right speakers close to seated ear height, with surrounds slightly above ear height to the side or just behind the main seat.
For a 5.1 layout, the center channel should sit as close to the display as possible so voices feel locked to the screen. Front left and right speakers should angle gently toward the primary listening position. Surrounds usually work best slightly above ear height, not near the ceiling. If you add Atmos, keep the height speakers symmetrical and avoid placing them so far off-axis that the overhead effect turns vague.
Subwoofers depend heavily on the room. One corner placement may be convenient, but it can also exaggerate peaks and nulls. Try a few likely positions along the front wall or opposing corners, then adjust phase and crossover after the speakers are level-matched. Calibration matters more than adding extra channels too early.
- Calibrate speaker distances and levels before upgrading hardware
- Use rugs, curtains, and selective absorption to reduce harsh reflections
- Keep equipment ventilation and fan noise in mind when placing the rack or cabinet
What HDMI 2.1 and eARC Details Actually Matter?
Use Ultra High Speed HDMI cables when you need 4K/120 gaming features, and use eARC when the TV must pass full-quality audio back to a receiver or soundbar.
This is where many otherwise good installs become unreliable. If the system includes a current console or gaming PC, use cable paths that support HDMI 2.1 bandwidth and keep the runs realistic. For longer runs to a closet or cabinet, plan the signal path deliberately instead of assuming any random cable or balun will behave well with 4K/120, VRR, and HDR. eARC is still the cleanest way to return audio from the TV's built-in apps to the sound system, but it works best when the cabling, device settings, and firmware are all aligned.
Label both ends of every HDMI path, especially if the rack is remote. The labor saved later is worth more than the minute it takes during install. If your project includes a media wall, longer HDMI paths, or hidden gear, the planning sequence in Home media wall setup is worth reviewing before drywall or finish carpentry closes things up.
When Should You Centralize Equipment in a Cabinet or Rack?
Move sources into a ventilated cabinet or rack when heat, fan noise, cable clutter, or visible boxes would otherwise dominate the room.
Centralized gear makes the viewing wall cleaner and often makes service easier, but it only works when airflow, access, and cable routing are handled correctly. Leave service loops, keep vents clear, and avoid stuffing streaming boxes, receivers, and game consoles into sealed millwork. A neat wall with an overheated cabinet is not a finished system.
In family rooms, a nearby cabinet is often enough. In larger projects, a dedicated closet rack can reduce noise at the seating position and leave room for network gear, streamers, amplifiers, and future expansion. If whole-home audio, outdoor speakers, or multiple zones may come later, this is the point where spare cabling and conduit pay off.
How Do Whole-Home Audio and Smart Home Control Work Together?
Whole-home audio works best when zones, control methods, and network reliability are planned together instead of added one room at a time.
Platforms like Sonos remain practical for casual, multi-room listening because they are easy to use and easy to expand. The key is to build zones around real behavior: kitchen, patio, living room, office, not arbitrary speaker counts. In-ceiling and in-wall speakers should be spaced for even coverage, not maximum volume from one corner. Outdoor zones usually sound better with more speakers playing lower rather than one or two speakers trying to cover the whole yard.
Smart-home integration is useful here, but it helps to stay precise about what the standards actually do. Apple Home, Google Home, and Matter are more relevant to scenes, hubs, power control, room grouping, sensors, and voice routines than to replacing a proper AV control plan. Apple's support guidance still points to Apple TV 4K or HomePod-class devices for the best Matter and Thread experience, while Google continues to rely on products like Nest Hub, Nest Hub Max, Nest Wifi Pro, and Google TV Streamer for hub and Thread-border-router duties. For LG displays specifically, Integrating LG webOS TVs with smart home platforms covers what is realistic today.
What Budget Should You Expect for a Home Entertainment Upgrade?
Most projects fall into basic, mid-range, or premium tiers based on how much hardware, wiring, and room integration the space actually needs.
| Tier | Typical equipment | Best fit |
|---|---|---|
| Basic | TV, fixed or tilt mount, soundbar, concealed low-voltage, simple streamer | Main living rooms that need a cleaner install and better TV audio |
| Mid-range | Larger TV or brighter panel, eARC soundbar with sub and surrounds or entry AVR, improved cabinet planning | Homes that want stronger movie audio without building a full theater |
| Premium | OLED or flagship Mini-LED, AVR-based surround or Atmos, rack or closet equipment, control, multi-zone audio | Dedicated media rooms or whole-home projects where performance and expandability matter |
This framework helps qualify the project before you start comparing product families. Budget questions are usually really scope questions: how much gear stays visible, how much wiring is hidden, how many zones need to behave consistently, and how much future expansion should already be designed into the room.
Common Pitfalls to Avoid
- Mounting the display too high because the wall "looks right" that way
- Running power inside the wall without a proper in-wall solution
- Treating long HDMI runs as an afterthought
- Overbuying channels before speaker placement and calibration are correct
- Ignoring cabinet ventilation, service access, and cable labeling
- Assuming Matter replaces a solid AV control and network plan
Quick Checklist
- Measure the main seat to screen wall before choosing TV size.
- Set the screen center for seated comfort, then verify speaker and furniture clearance.
- Plan power, low-voltage, and HDMI paths before the mount location is finalized.
- Choose soundbar simplicity or AVR flexibility based on the room, not forum advice.
- Leave room for airflow, cable slack, and future expansion if the system may grow later.
References
External sources checked March 4, 2026.
Plan the project with a site visit
Confirm wiring, equipment, placement, and installation scope before hardware is locked in.