
- Quick summary
- When Should You Install a Wired Cat6 Network?
- How Do You Plan a Cat6 Layout?
- How Do You Choose a Central Network Rack Location?
- How Many Ethernet Drops Should You Plan Per Room?
- What Is the Difference Between Cat5e, Cat6, and Cat6A?
- How Much Does Cat6 Installation Cost in 2026?
- What Parts Are Used in a Professional Cat6 Installation?
- How Does a Professional Cat6 Installation Work?
- Mesh Wi-Fi vs Hardwired Backhaul: Which Performs Better?
- Should You DIY or Hire a Pro?
- How Should You Prepare for a Quote?
- Common questions
- References
Quick summary
Install Cat6 when fixed devices and access points need more predictable performance than Wi-Fi alone can provide.
In 2026, Cat6 remains the practical default for most new home and small-office installs. Use Cat6A selectively for full-length 10 Gb/s links, noisier pathways, and a few critical uplinks where the extra size and cost make sense.
For budget planning, public 2026 cost guides put straightforward in-wall network runs in the low hundreds per run nationally, while finished-wall retrofits, rack work, patching, and local construction constraints can push totals materially higher.
- Network cabling cost guide
- How to wire a home for Ethernet room by room
- Cat6 & wired network installation in Westchester
- Networking & Infrastructure services
When Should You Install a Wired Cat6 Network?
Install a wired Cat6 network when Wi-Fi congestion, call instability, or wireless mesh compromises are affecting how the space actually works.
Wi-Fi is still the right tool for phones, tablets, and roaming laptops. The improvement comes from moving fixed, high-demand traffic off the air and onto dedicated copper runs. In many homes and offices, that shift improves consistency more than another router upgrade.
- Prioritize fixed devices: TVs, streamers, desktops, printers, NAS units, and game consoles benefit most from Ethernet.
- Prioritize work reliability: If two or more people depend on video calls or cloud work, stable wired links reduce contention.
- Prioritize AP backhaul: Access points perform better when backhaul is wired instead of spending airtime on mesh hops.
- Prioritize renovations: Open walls, attic access, and basement access make wiring far more cost-effective.
- Prioritize future expansion: Multi-gig internet, Wi-Fi 7 access points, and faster local transfers all benefit from a wired core.
How Do You Plan a Cat6 Layout?
Plan a Cat6 layout by sketching the floor plan, marking fixed devices and AP locations, and home-running every drop back to one central rack or panel.
The layout matters more than the brand of cable. A simple room-by-room plan keeps the project scalable, easier to quote, and easier to support later.
Use a hub-and-spoke layout so each room drop and access point lands in one labeled patch panel.
- Mark the real usage zones: Desks, TVs, conference tables, printers, and ceiling AP locations should be decided before any drilling.
- Home-run every cable: Each drop should return to the rack; do not daisy-chain room to room.
- Count spares now: Pulling one extra line to a media wall or office is usually cheaper than reopening walls later.
- Think in five-year terms: A den may become an office, and a playroom may later need a wired desk or AP.
If a wall is already open or a route is already being fished, adding one spare Cat6 run is usually cheap insurance.
How Do You Choose a Central Network Rack Location?
Choose a ventilated, reachable location with power, reasonable access to vertical cable paths, and enough room to keep all runs under standard length limits.
In homes and small offices, this is often a basement corner, utility room, closet, or small dedicated shelf area. The goal is a tidy, serviceable landing point for the modem or ONT, gateway, switch, patch panel, and UPS if needed.
- Prioritize ventilation: Switches, gateways, and PoE gear create continuous heat.
- Prioritize access: You should be able to reach the rack without moving furniture or unloading storage.
- Prioritize acoustics: Fan-cooled switches are better kept away from bedrooms and quiet offices.
- Prioritize pathing: Basements, closets, and attic drops usually matter more than geometric center alone.
- Prioritize standards: Keep total channel length within 100 m including patch leads.
In older Westchester homes with plaster-and-lath, masonry, or fire blocking, we usually map basement, closet, and attic routes first. Exterior conduit can be the cleaner option when it avoids larger interior wall damage.
How Many Ethernet Drops Should You Plan Per Room?
Most homes and small offices do not need Ethernet in every wall. Planning by room helps keep the scope realistic while covering the places where wired connections are most useful.
| Room or location | Typical starting point | Why it helps |
|---|---|---|
| Living room or media wall | 2 to 3 drops | Covers the TV, streamer, console, and one spare for future devices |
| Home office | 2 drops | Supports a docked laptop or desktop plus a printer, phone, or spare |
| Bedroom or flex room | 1 drop | Covers a future TV, desk, or work area without overbuilding |
| Ceiling AP location | 1 drop | Gives the access point wired backhaul and PoE power where applicable |
| Conference room or meeting area | 2 drops | Covers a room display, table device, or spare room hardware |
| Network rack or closet | Spare patch panel capacity | Makes later additions easier without replacing hardware immediately |
These are planning defaults, not fixed rules. A media-heavy room, a shared office, or a space with future camera or access-point plans may justify more.
What Is the Difference Between Cat5e, Cat6, and Cat6A?
Cat5e is often still usable, Cat6 is the best default for new installs, and Cat6A is the right upgrade for selective 10 Gb/s and high-headroom runs.
The right choice depends on whether you are preserving working cabling, adding a few new drops, or building a fresh structured layout. In many projects, a mixed approach is the most practical choice.
| Cable | Practical 2026 role | Speed guidance | Main tradeoff |
|---|---|---|---|
| Cat5e | Keep if existing runs are labeled, clean, and already stable | 1 Gb/s to 100 m; 2.5/5 Gb/s is commonly supported on existing cabling with the right gear | Not the best choice for most new installs |
| Cat6 | Default choice for new room drops, TVs, desks, and most APs | 1 Gb/s to 100 m; 10 Gb/s on shorter runs, often about 37-55 m depending on environment | Less margin than Cat6A for full-length 10 Gb/s |
| Cat6A | Selective use for uplinks, noisy paths, and stable 10 Gb/s plans | 10 Gb/s to 100 m | Thicker cable, larger bend radius, slower retrofit pulls |
- Keep good Cat5e where it earns its place: Existing short, stable runs do not need to be ripped out just because a newer category exists.
- Choose Cat6 for new general-purpose work: It is the clean default for most residential and small-office projects.
- Choose Cat6A selectively: Use it where the run length, interference profile, or hardware plan justifies the added bulk.
- Avoid CCA entirely: Permanent in-wall runs should be solid copper, not copper-clad aluminum.
How Much Does Cat6 Installation Cost in 2026?
Plan Cat6 installation by scope, not just by cable price: route difficulty, finished walls, patching, rack work, and AP drops usually drive more cost than the copper itself.
Public 2026 pricing references are useful for calibration. Homewyse places a basic in-wall network cable install at roughly $233 to $457 per run in favorable conditions, and broader national CAT6 guides still cite about $125 to $250 per drop as a baseline. Those are planning numbers, not quotes, and older finished homes often exceed them.
| Scenario | Typical planning range | What usually changes the price |
|---|---|---|
| 2 to 4 straightforward drops | Low four figures | Basement or attic access, simple terminations, minimal patching |
| 4 to 8 finished-wall retrofit drops | Low to mid four figures | Fishing walls, patch and paint coordination, rack cleanup |
| 12 to 24 run renovation or pre-wire | Varies, but usually lower per drop than retrofit | Coordination with builder, AP drops, rack size, labeling and testing |
| Small office refresh with AP drops | Low to mid four figures before major hardware changes | After-hours work, PoE switching, conference-room or desk density |
- Construction matters most: Plaster, stone, fire blocking, finished ceilings, and long horizontal paths add labor quickly.
- Rack work matters: Patch panels, labeling, UPS space, and cable management change the total more than many owners expect.
- AP and camera drops matter: Ceiling work and PoE planning usually cost more than a basic desk drop.
- Scheduling matters: After-hours office work and coordinated builder schedules add cost but reduce disruption.
For a deeper budget breakdown, see our network cabling cost guide.
What Parts Are Used in a Professional Cat6 Installation?
A professional Cat6 installation usually includes solid-copper in-wall cable, keystone jacks, a patch panel, short patch cords, and testing plus labeling at both ends.
Understanding the parts makes quotes easier to compare and helps distinguish a structured install from an improvised one.
- Bulk cable: Solid-copper Cat6 or Cat6A for permanent in-wall and in-ceiling runs.
- Keystone jacks and wall plates: Clean room-end terminations that protect the cable and make device swaps easy.
- Patch panel: One labeled landing point in the rack instead of loose terminated ends.
- Patch cords: Short stranded cables between devices and wall jacks, and between the patch panel and switch.
- Rack or bracket: A serviceable mounting point for the gateway, switch, patch panel, and accessories.
- Testing tools: Continuity testing at minimum, with certification-grade validation for higher-confidence installs.
This card highlights the product details most relevant to this section.
- 12 ports, Cat6, supports 10G Ethernet (TIA/EIA 568-C.2 compliant)
- Works in standard 19-inch racks, wall-mount brackets, and cabinets
- Includes D-rings and cable ties; punch-down type termination
- Label strips for port identification
This card highlights the product details most relevant to this section.
- 10G‑rated Cat6A with larger bend radius
- Solid copper conductors for higher PoE loads
- Riser-rated bulk cable suitable for structured cabling backbones

This card highlights the product details most relevant to this section.
- Verifies pinout and continuity on Ethernet runs
- Remote terminator for one‑person testing
- Useful when validating new backhaul runs
This card highlights the product details most relevant to this section.
- 6U / 14-inch deep — fits most home closets and utility rooms
- 44 lb weight capacity; all-steel construction
- Standard 19-inch mounting for patch panels, switches, and shelves
- Low-profile design; minimal wall protrusion
How Does a Professional Cat6 Installation Work?
Most professional Cat6 projects follow a similar sequence: walkthrough, route planning, pulling, labeling, termination, testing, and handoff documentation.
That sequence matters because route choices, terminations, and labeling all affect how reliable and serviceable the finished network will be.
- Walkthrough and scope: Confirm drop locations, rack location, current pain points, and future needs.
- Route planning: Use attics, basements, closets, and low-impact wall paths where possible.
- Pulling and labeling: Run each cable as a labeled home run with clear naming at both ends.
- Termination: Land to patch panels and keystone jacks with consistent pinouts.
- Testing: Verify continuity and pair order at minimum; certify when the project requires stronger documentation.
- Handoff: Leave a port map, basic legend, and clear understanding of what each jack serves.
For a more complete closeout standard, use the network installation documentation checklist before the installer leaves the site.
Mesh Wi-Fi vs Hardwired Backhaul: Which Performs Better?
Hardwired backhaul is better when you want AP performance to stay predictable under load because the backhaul path no longer competes with client traffic for Wi-Fi airtime.
Wireless mesh can still be useful where wiring is genuinely impractical. In fixed buildings, though, a wired AP or wired mesh node is usually the more stable design because it removes a major variable from the RF plan.
| Design choice | Hardwired backhaul | Wireless mesh backhaul |
|---|---|---|
| Backhaul path | Dedicated Ethernet link | Shared radio link between nodes |
| Airtime use | Leaves Wi-Fi airtime for clients | Uses part of the Wi-Fi system for inter-node traffic |
| Performance under load | More consistent | More variable as client and backhaul traffic stack up |
| Roaming and support | Easier to troubleshoot and tune | More dependent on placement and RF conditions |
| Best fit | Homes and offices where stability matters most | Cable-free areas where light to moderate use is acceptable |
If access points are already part of the plan, wiring the primary AP locations usually improves day-to-day consistency more than adding more wireless hops.
This card highlights the product details most relevant to this section.
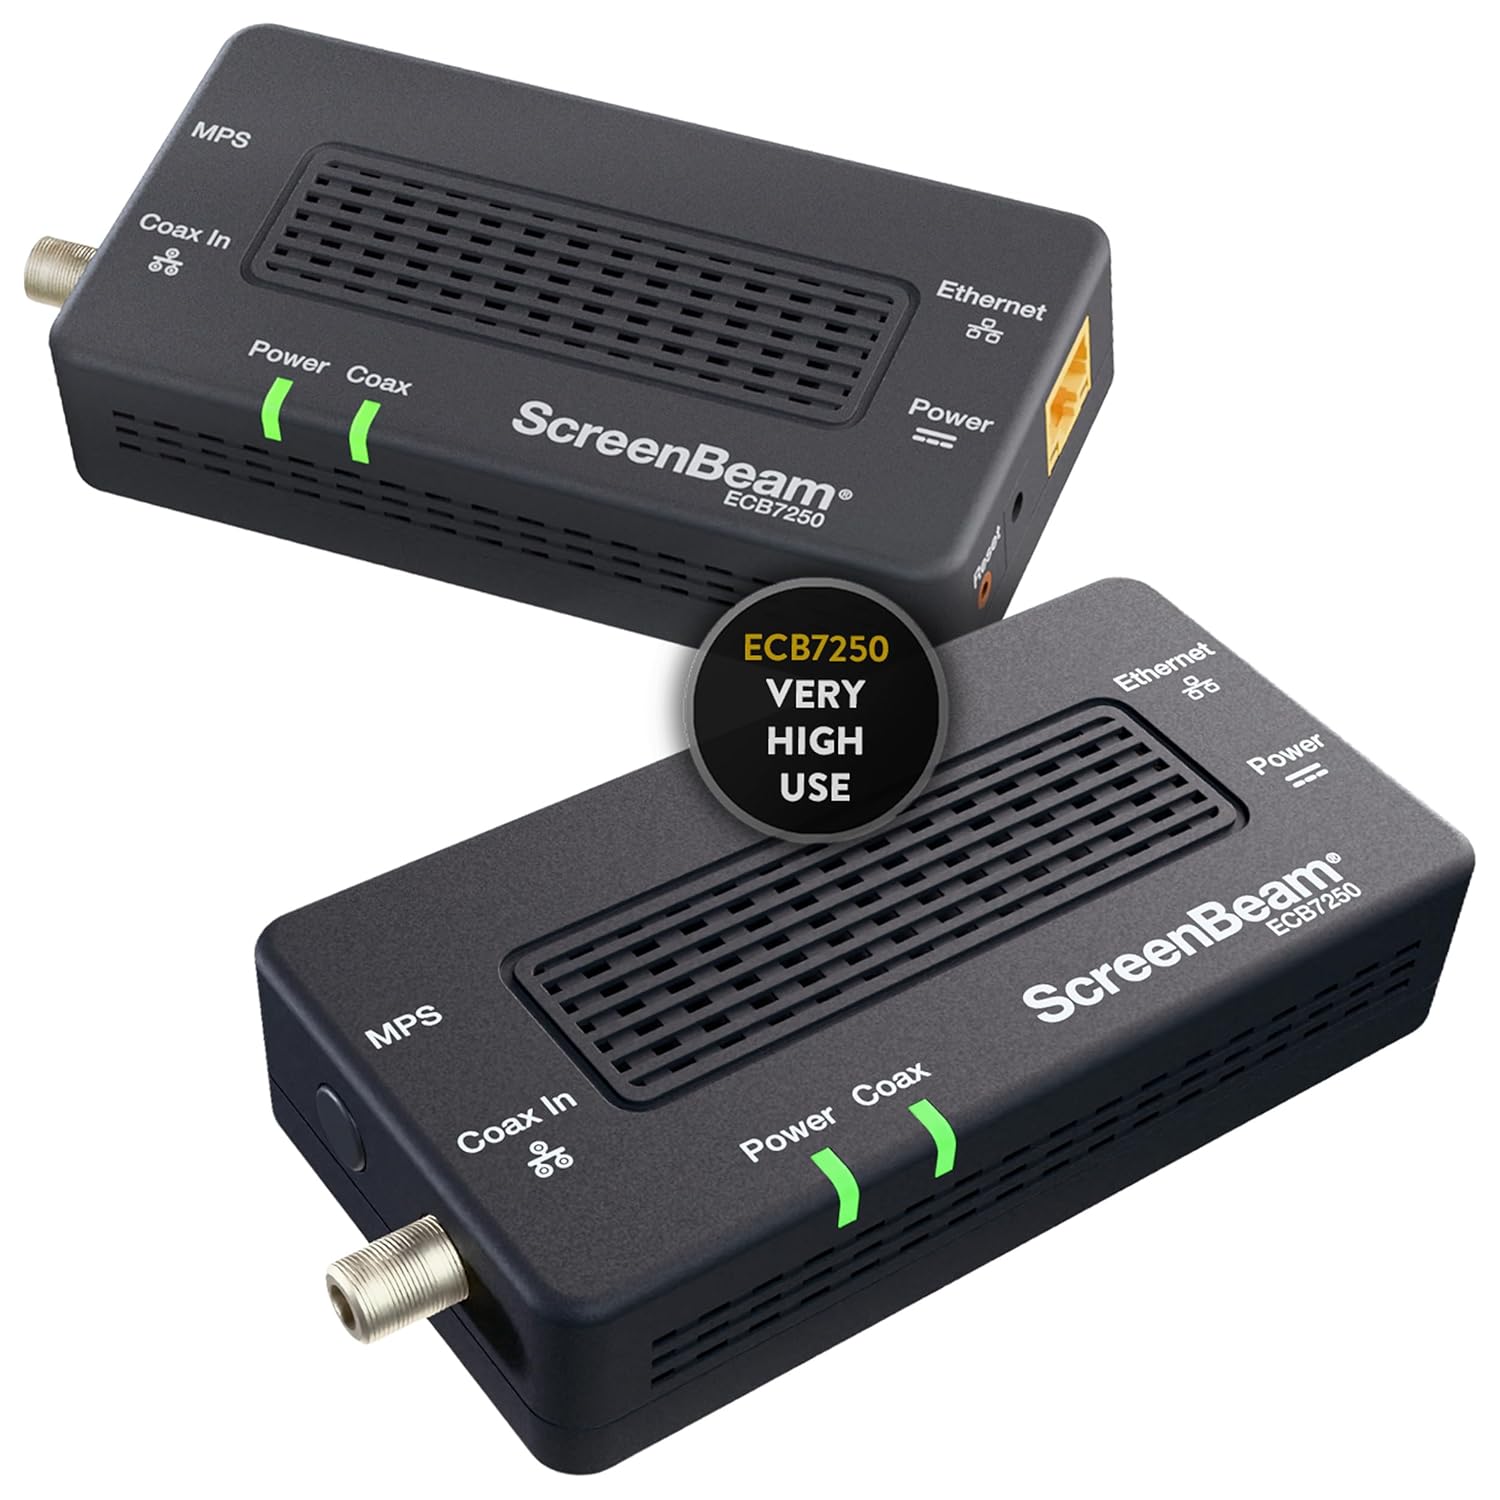
- Converts existing coax to Ethernet backhaul up to 2.5 Gbps
- Great for wiring between floors without pulling new cable
- Includes two adapters for a typical starter-kit backhaul

This card highlights the product details most relevant to this section.
- Wi-Fi 7 (802.11be) tri-band with 2.4, 5, and 6 GHz radios
- 2x2 MIMO on each band, with 6 GHz support for newer client devices
- Ceiling-mount form factor that works best with wired backhaul and central placement
- 1x 2.5 GbE uplink that works with modern PoE+ switching
This card highlights the product details most relevant to this section.
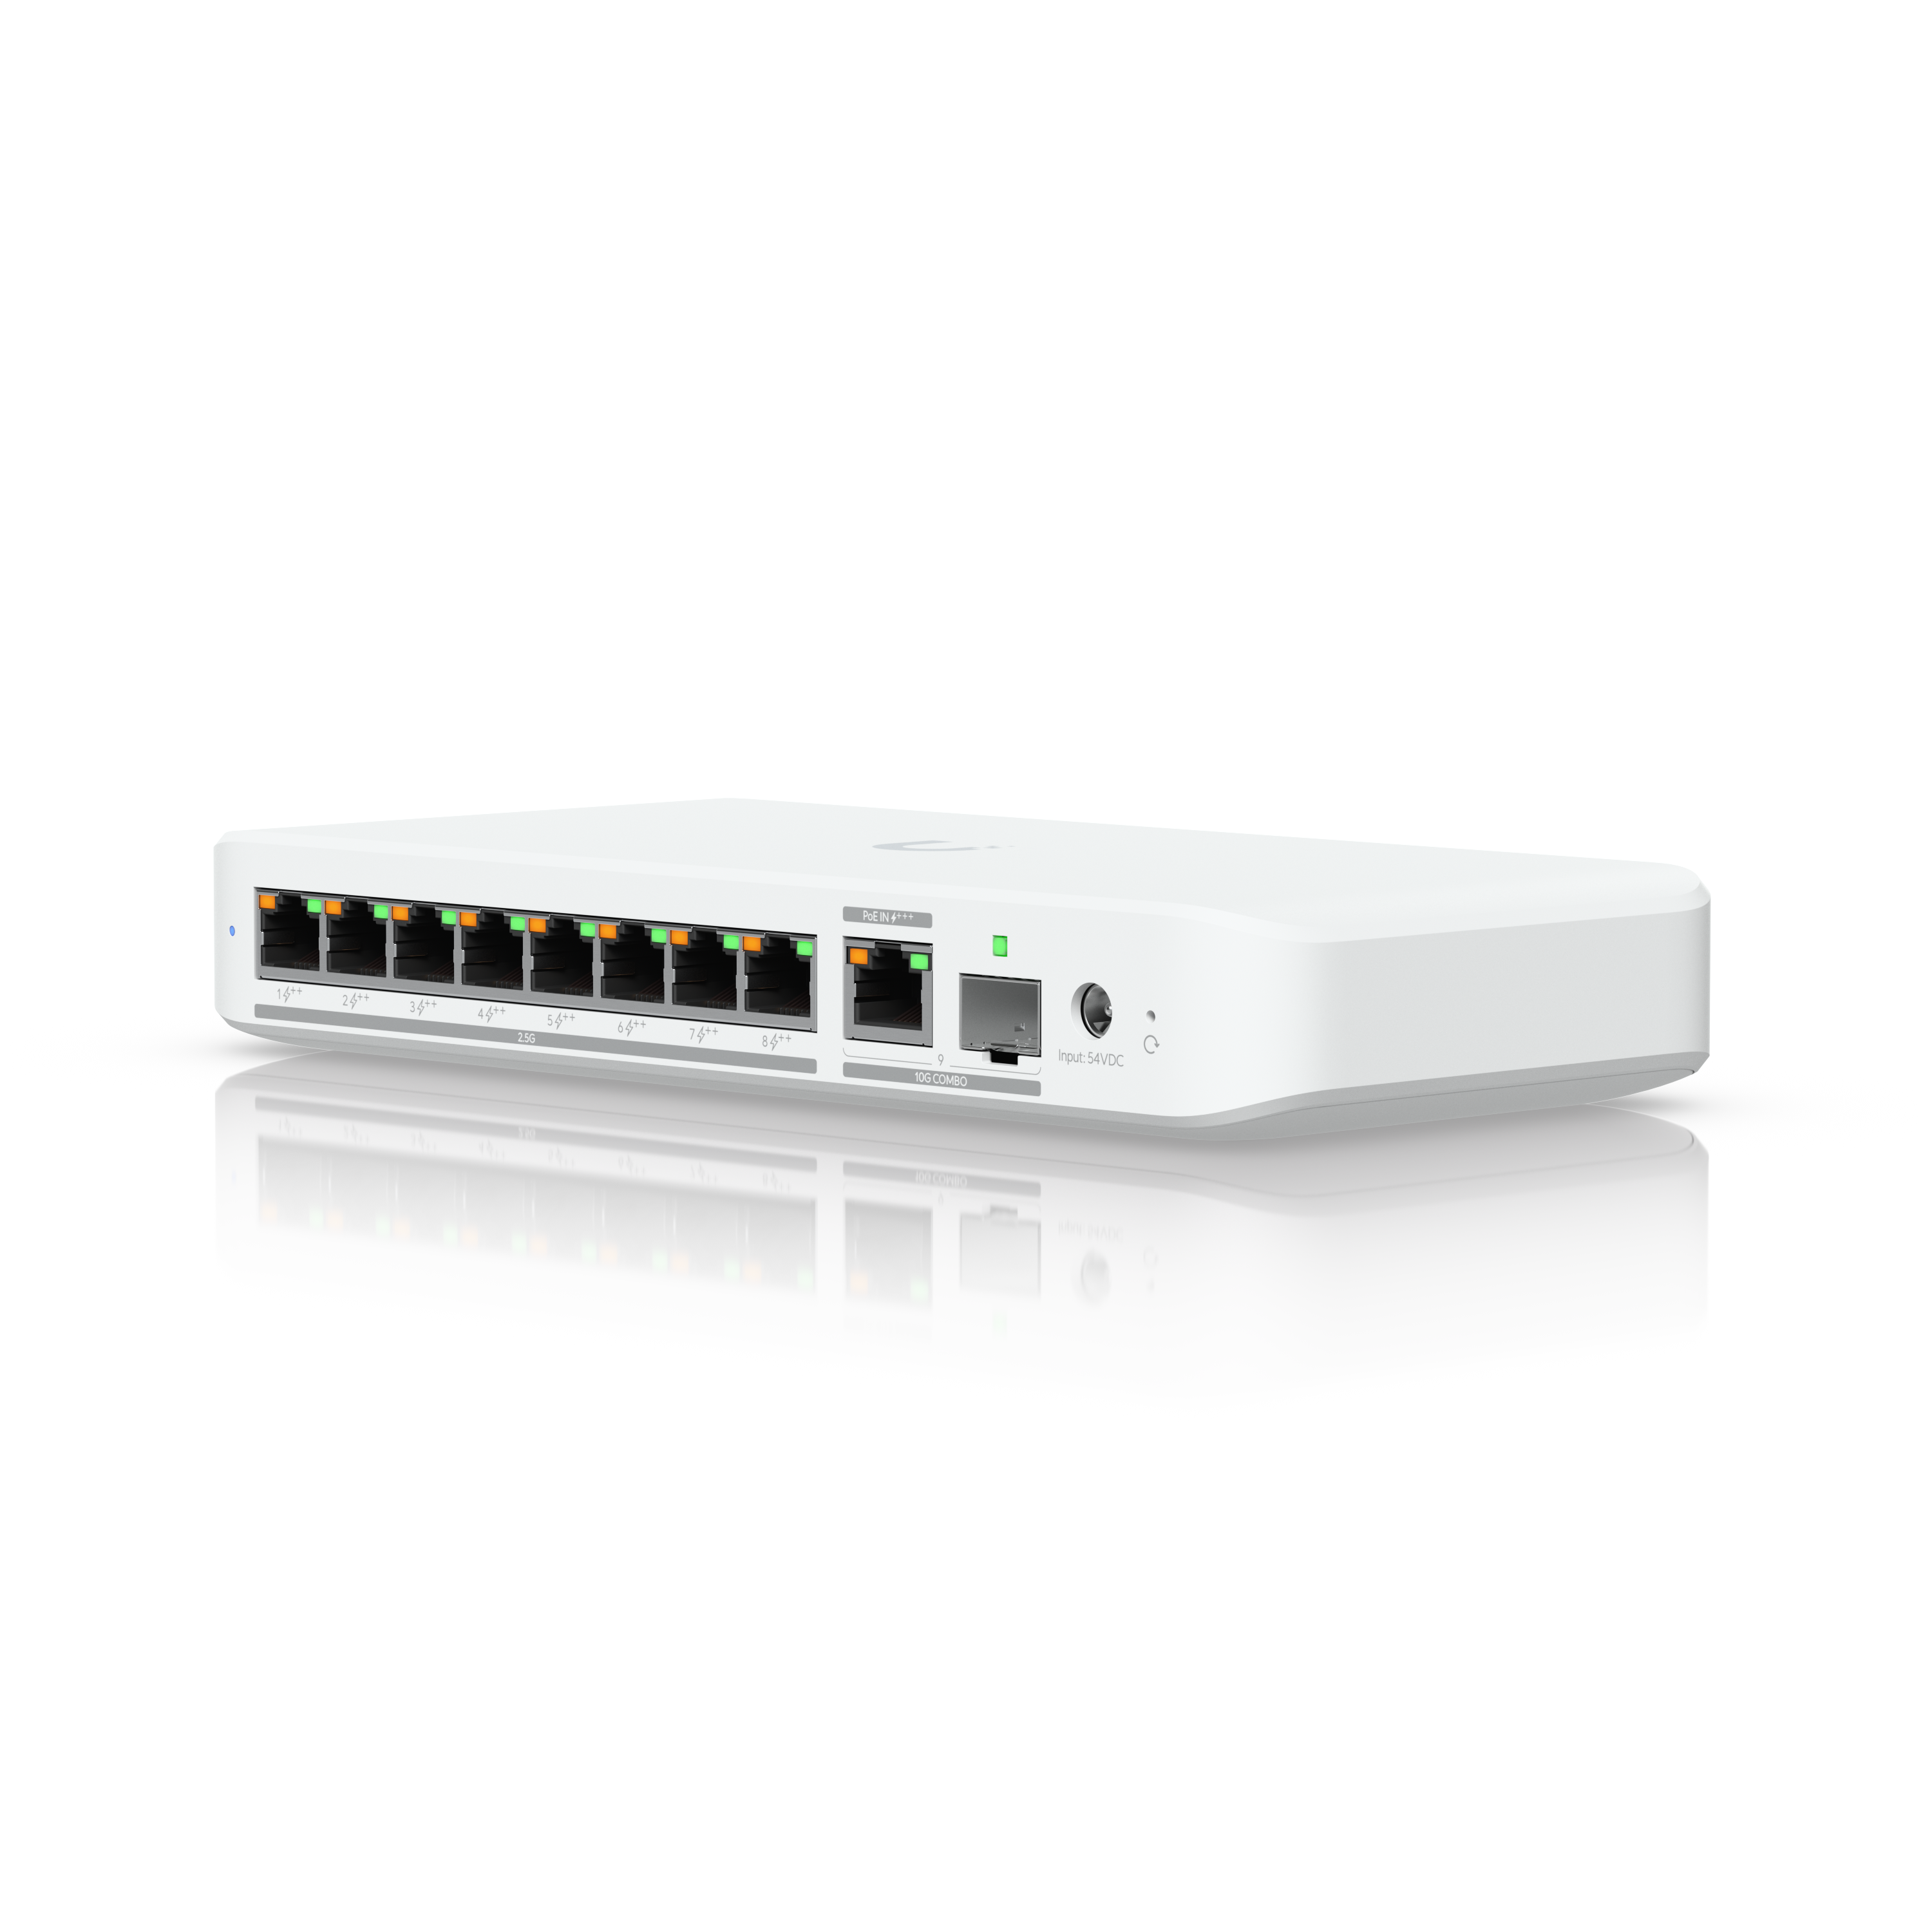
- 8-port 2.5 GbE switching
- PoE++ output for newer UniFi edge devices
- 10 GbE RJ45/SFP+ combination uplink for cleaner upstream growth
Should You DIY or Hire a Pro?
DIY is reasonable for simple patching and a small number of easy-access runs. Finished-wall retrofits, multi-room jobs, and documentation-heavy installs are usually better handled professionally.
The practical dividing line is building access, finish sensitivity, safety, and how much testing and documentation the project requires.
- DIY is reasonable for: Patch cords, small rack cleanup, and a few obvious runs where you fully understand the structure.
- Hire a pro for: Multi-room retrofits, plaster or masonry walls, AP ceiling drops, and jobs where minimal visible impact matters.
- Hire a pro for testing: Certification-grade testing and durable documentation are hard to replicate with basic consumer tools.
- Hire a pro for speed: Coordinated installs are usually faster and easier to expand later.
If you are unsure about drilling near electrical wiring, fire stops, ladders, or exterior penetrations, the safer move is to involve a professional from the start.
How Should You Prepare for a Quote?
Prepare for a Cat6 quote by listing devices, sketching the rooms that need Ethernet, and identifying where disruption or patching would be unacceptable.
You do not need CAD drawings. A phone photo of a floor plan or a simple hand sketch is usually enough to move from vague interest to a usable scope.
- List the devices: TVs, desks, printers, APs, cameras, NAS units, and conference-room gear.
- Mark likely jack positions: Behind the TV, beside desks, above ceiling AP locations, and near room displays.
- Note the construction challenges: Plaster, masonry, finished basements, exterior walls, or rooms with no attic or basement path.
- Note the existing network gear: Internet speed, router model, current switch, and any existing Ethernet or coax.
- Define the finish standard: Say early if visible raceway, patching, or exterior conduit are acceptable or unacceptable.
Common questions
Do I need Cat6A instead of Cat6 at home?
Usually no. Cat6 is the right default for most new home and small-office drops. Choose Cat6A for selective long uplinks, noisier paths, or specific 10 Gb/s plans where the extra size and cost are justified.
Should I replace existing Cat5e if it already works?
Not automatically. Existing Cat5e that is labeled, stable, and performing well can often stay in service. The usual upgrade decision is about new runs and future layout quality, not replacing every cable on principle.
How long can a Cat6 run be?
Ethernet standards allow up to 100 m for a full channel, typically 90 m of permanent cabling plus patch leads. In homes and small offices, most runs are far shorter than that.
Is wired backhaul still worth it with Wi-Fi 7?
Yes. Wi-Fi 7 improves wireless efficiency and latency, but a wired AP still avoids the airtime cost and variability of a wireless backhaul hop. The strongest design usually combines both: Ethernet for the backbone and Wi-Fi for mobility.
Can you ballpark cost before a site visit?
Yes, usually with a floor plan, a drop count, and a short description of the building. A walkthrough tightens the scope by confirming routes, construction constraints, and finish expectations.
References
- Fluke Networks: 10GBASE-T field testing requirements
- Cisco Multigigabit Ethernet white paper
- Wi-Fi Alliance: Wi-Fi CERTIFIED 7
- Wi-Fi Alliance introduces Wi-Fi CERTIFIED 7 (January 8, 2024)
- Wi-Fi Alliance extends Wi-Fi CERTIFIED 7 to 20 MHz-only devices (January 6, 2026)
- Homewyse: Cost to install in-wall network cable (January 2026)
- Fixr: CAT-6 installation cost
Plan the project with a site visit
Confirm wiring, equipment, placement, and installation scope before hardware is locked in.